
doors
...now browsing by tag
adobe
animal pictures
animals
bathroom
batteries
bobcat
books
cactus
camping
composting
concrete
construction
Coronado National Forest
cows
design
doors
dry wall
farmers market
floorplan
food
foodchoices
garden
garlic
greenhouse
Growing
hiking
horseshoe canyon
monsoon
movie
nm
paint
plumbing
roof
slab
solar
soycrete
stucco
stufftodo
tile
tomatoes
vigas
weather
wildlife
woodworking
xantrex
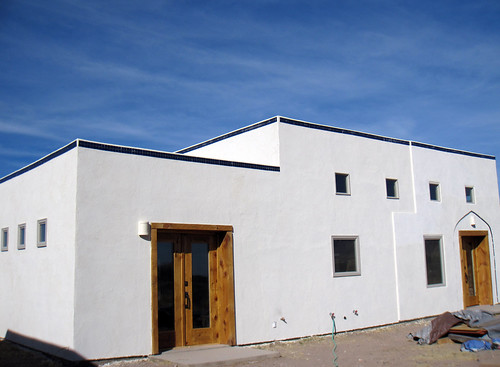
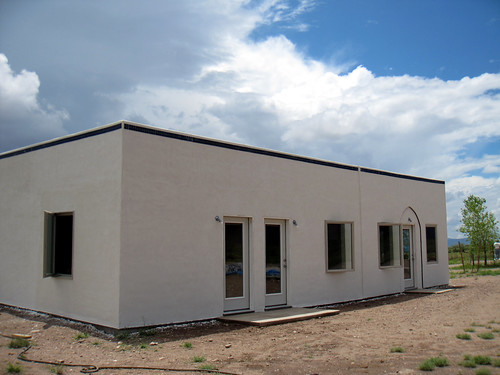
And the exterior is done!
Sunday, May 26th, 2013What we’ve been up to
Saturday, May 18th, 2013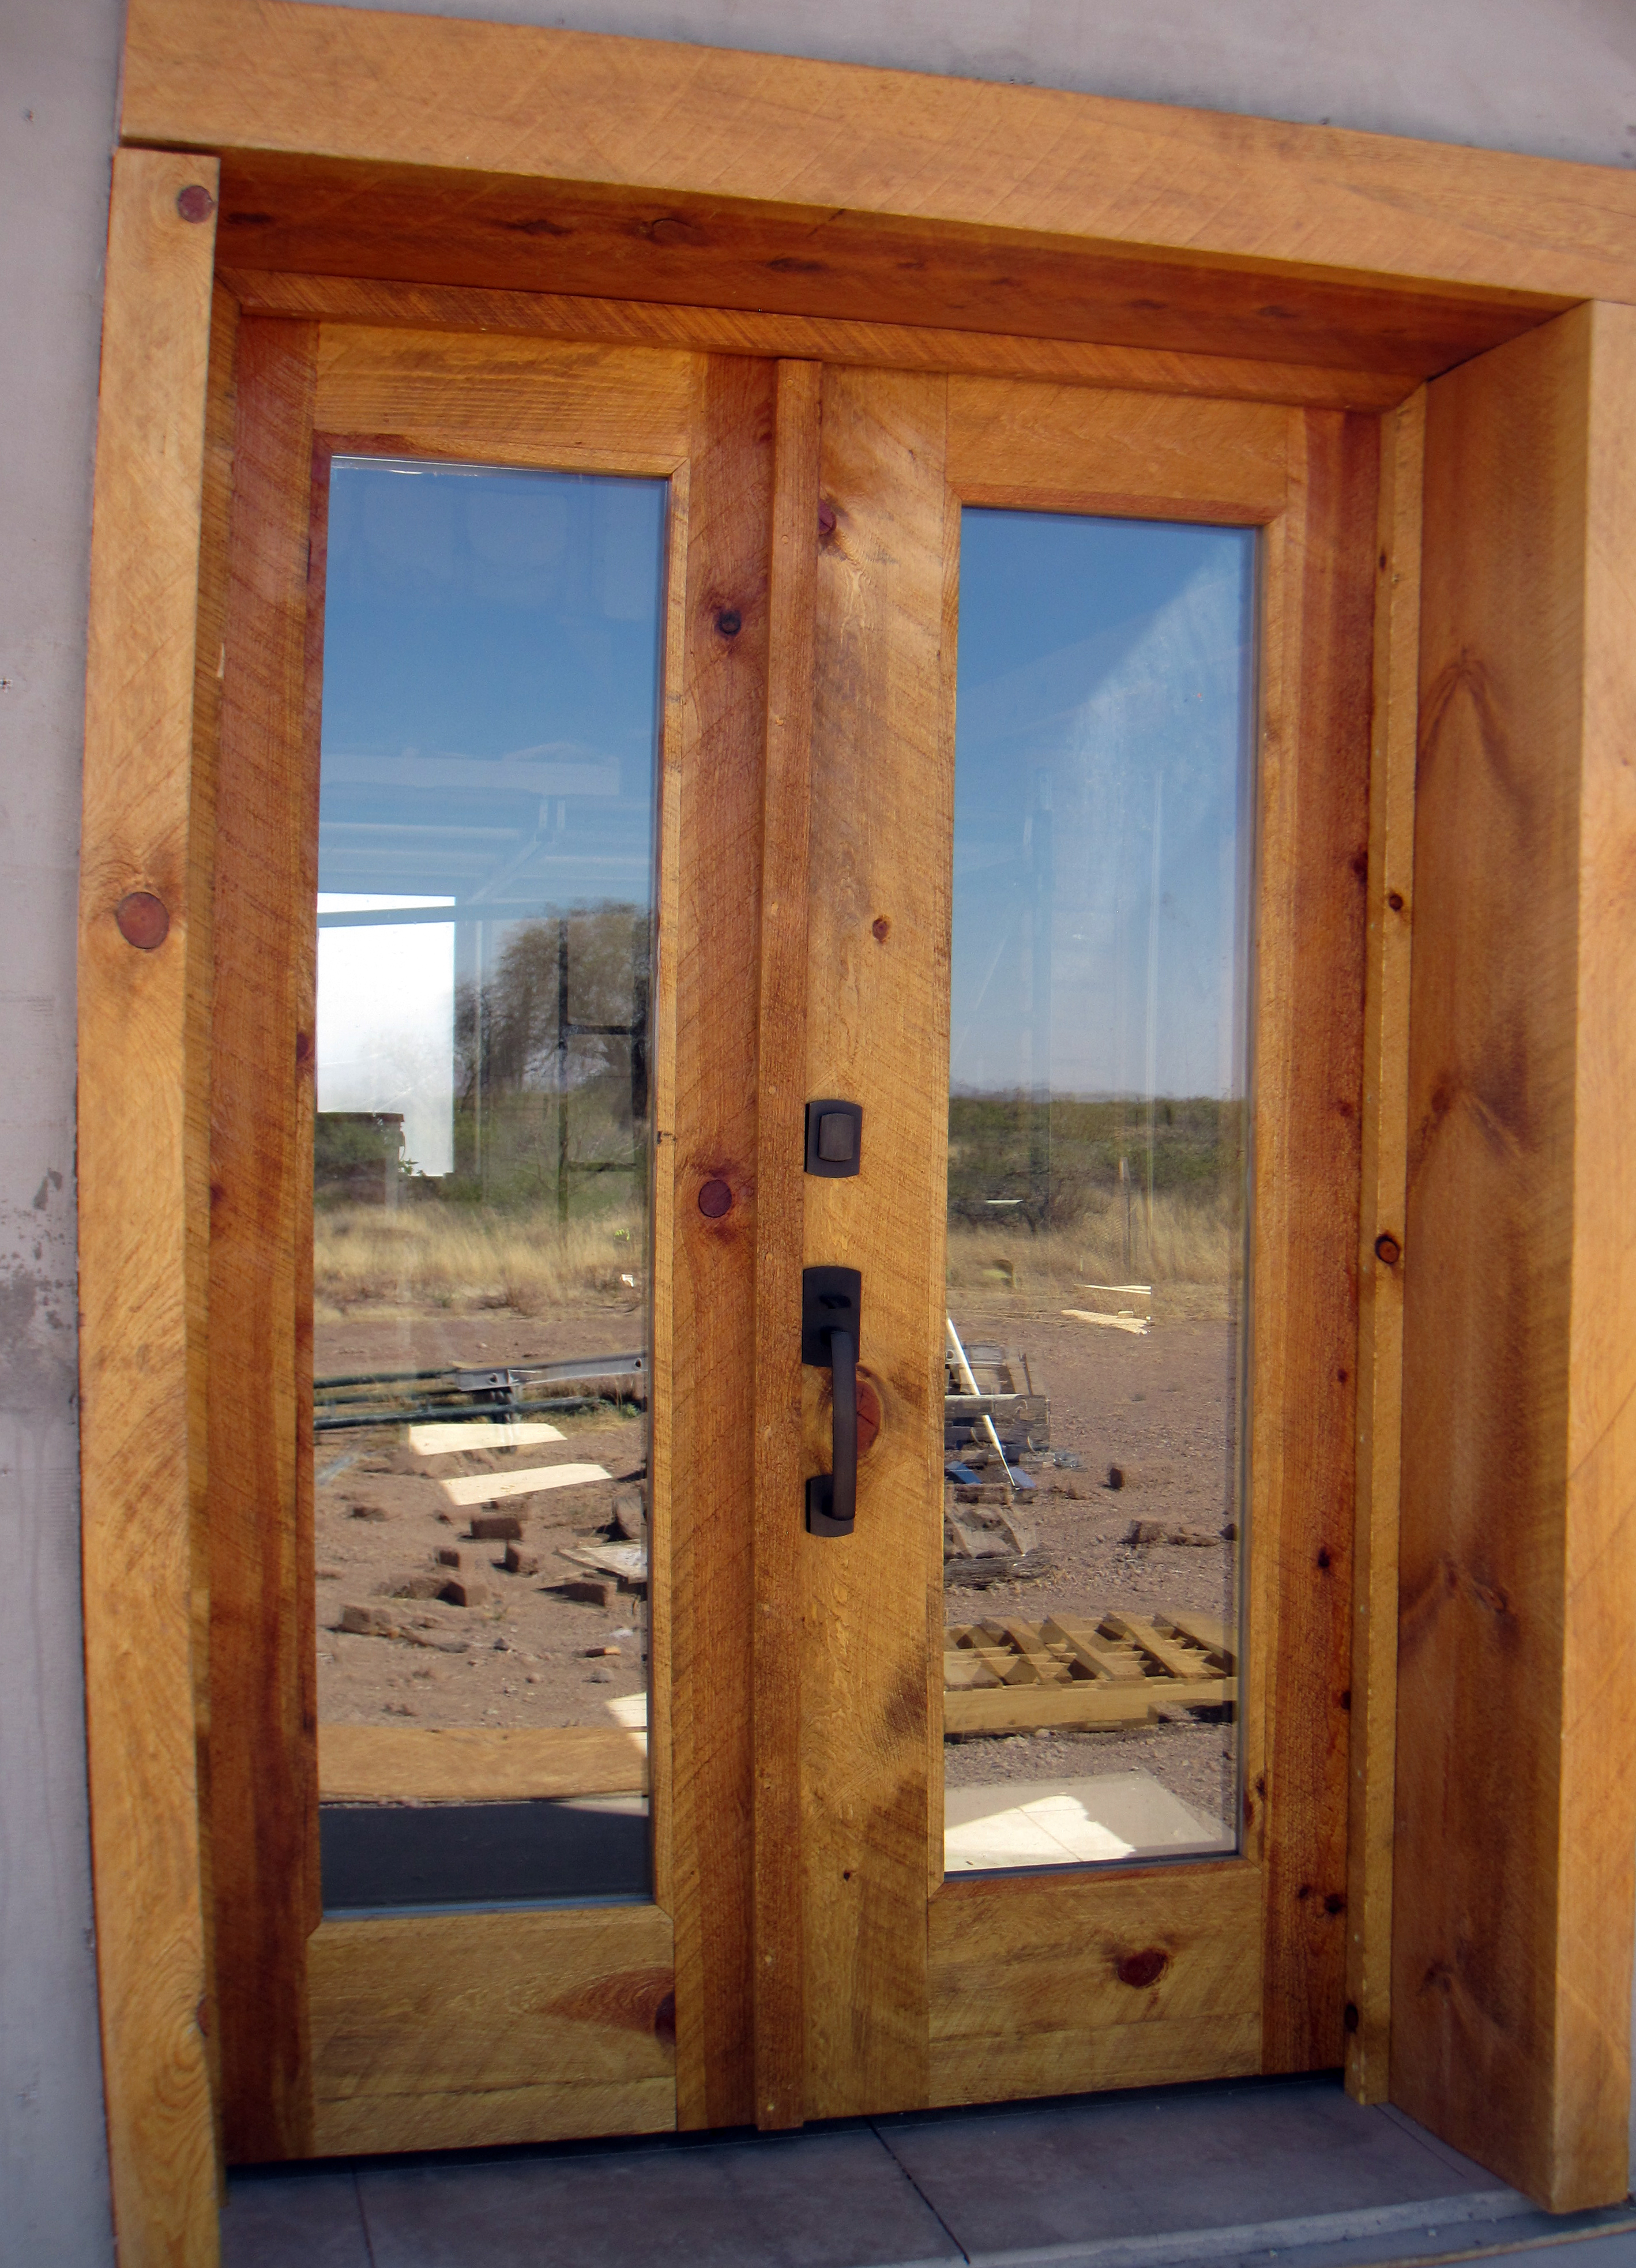
The guest house is officially open
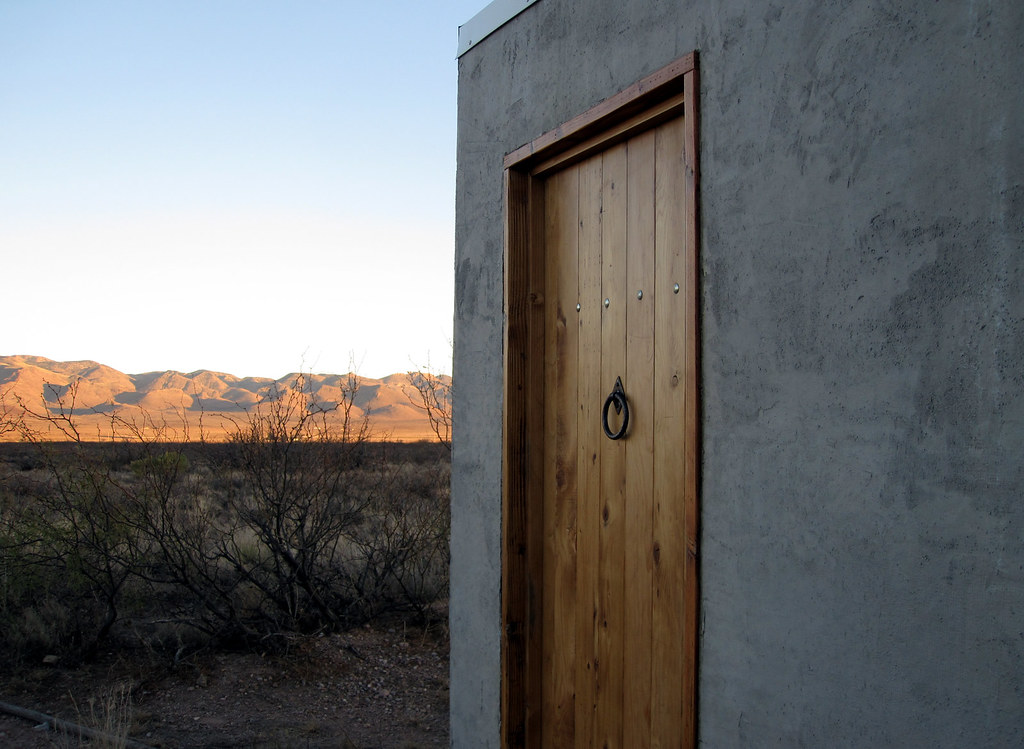
Wednesday, August 18th, 2010Yes, you guessed it — we now have a bathroom door.

More pictures here (I especially love the slide bolt latch from Wild West Hardware.)
The monsoons have been continuing here. This week, we had at least two downpours that lasted several hours. We were in the truck one afternoon when a bolt of lightning struck within 20 yards or so. (I’ve since learned that cars act as Faraday cages and that it is a good idea to wear shoes and not to lie on the floor during a storm if you have concrete floors.)
The rains have brought a plague of giant grasshoppers. The ground is crawling with them, and they are particularly attracted to concrete.

They are the most unbelievably uncoordinated things. If prompted to jump, they land on their heads or backs at least half the time. While I am preparing for the likely eventuality that they may eat my entire garden, I am hoping for something better. In the meantime, we have enjoyed eating beans and one tomato (more on the way) from the garden. The cucumbers are also finally taking off.
We had our first day with Internet down today. (I am actually writing this offline. Of course, as you read this, you will know that it has been restored.) I guess it’s good that it hasn’t happened until now. When we were in the rental house, we seldom had Internet outages, though the power went off nearly every time it rained. Brad takes great delight in the fact that our (solar) power stays on regardless of the weather. I can’t quite get used to it and still cringe when I’m on the computer and a big bolt of lightning strikes.
House #1 is done
Wednesday, July 28th, 2010Not that there aren’t a thousand things still to do, but with the final stucco on, I’m calling it done.
We finished the final coat on the house today.
We also got the battery house done. Now my beautiful door has a proper backdrop!
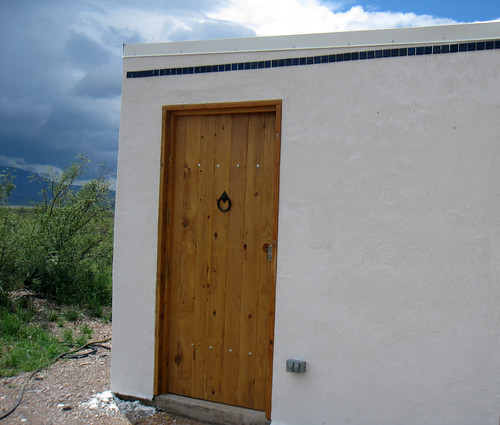
While we were working on this, I noticed that some of the varnish on the frame is peeling a bit. Probably a result of being taped several times and the hot sun. (It’s been almost 8 months.) I’ll need to put another coat on.
This was my first real encounter with the dreaded “maintenance” issue of home ownership. I mentioned this to Brad, and he told me that the Golden Gate Bridge is continually being painted. It takes about 2 years to paint it, and by the time they finish, it’s time to start again. Hmmm.
Note to self
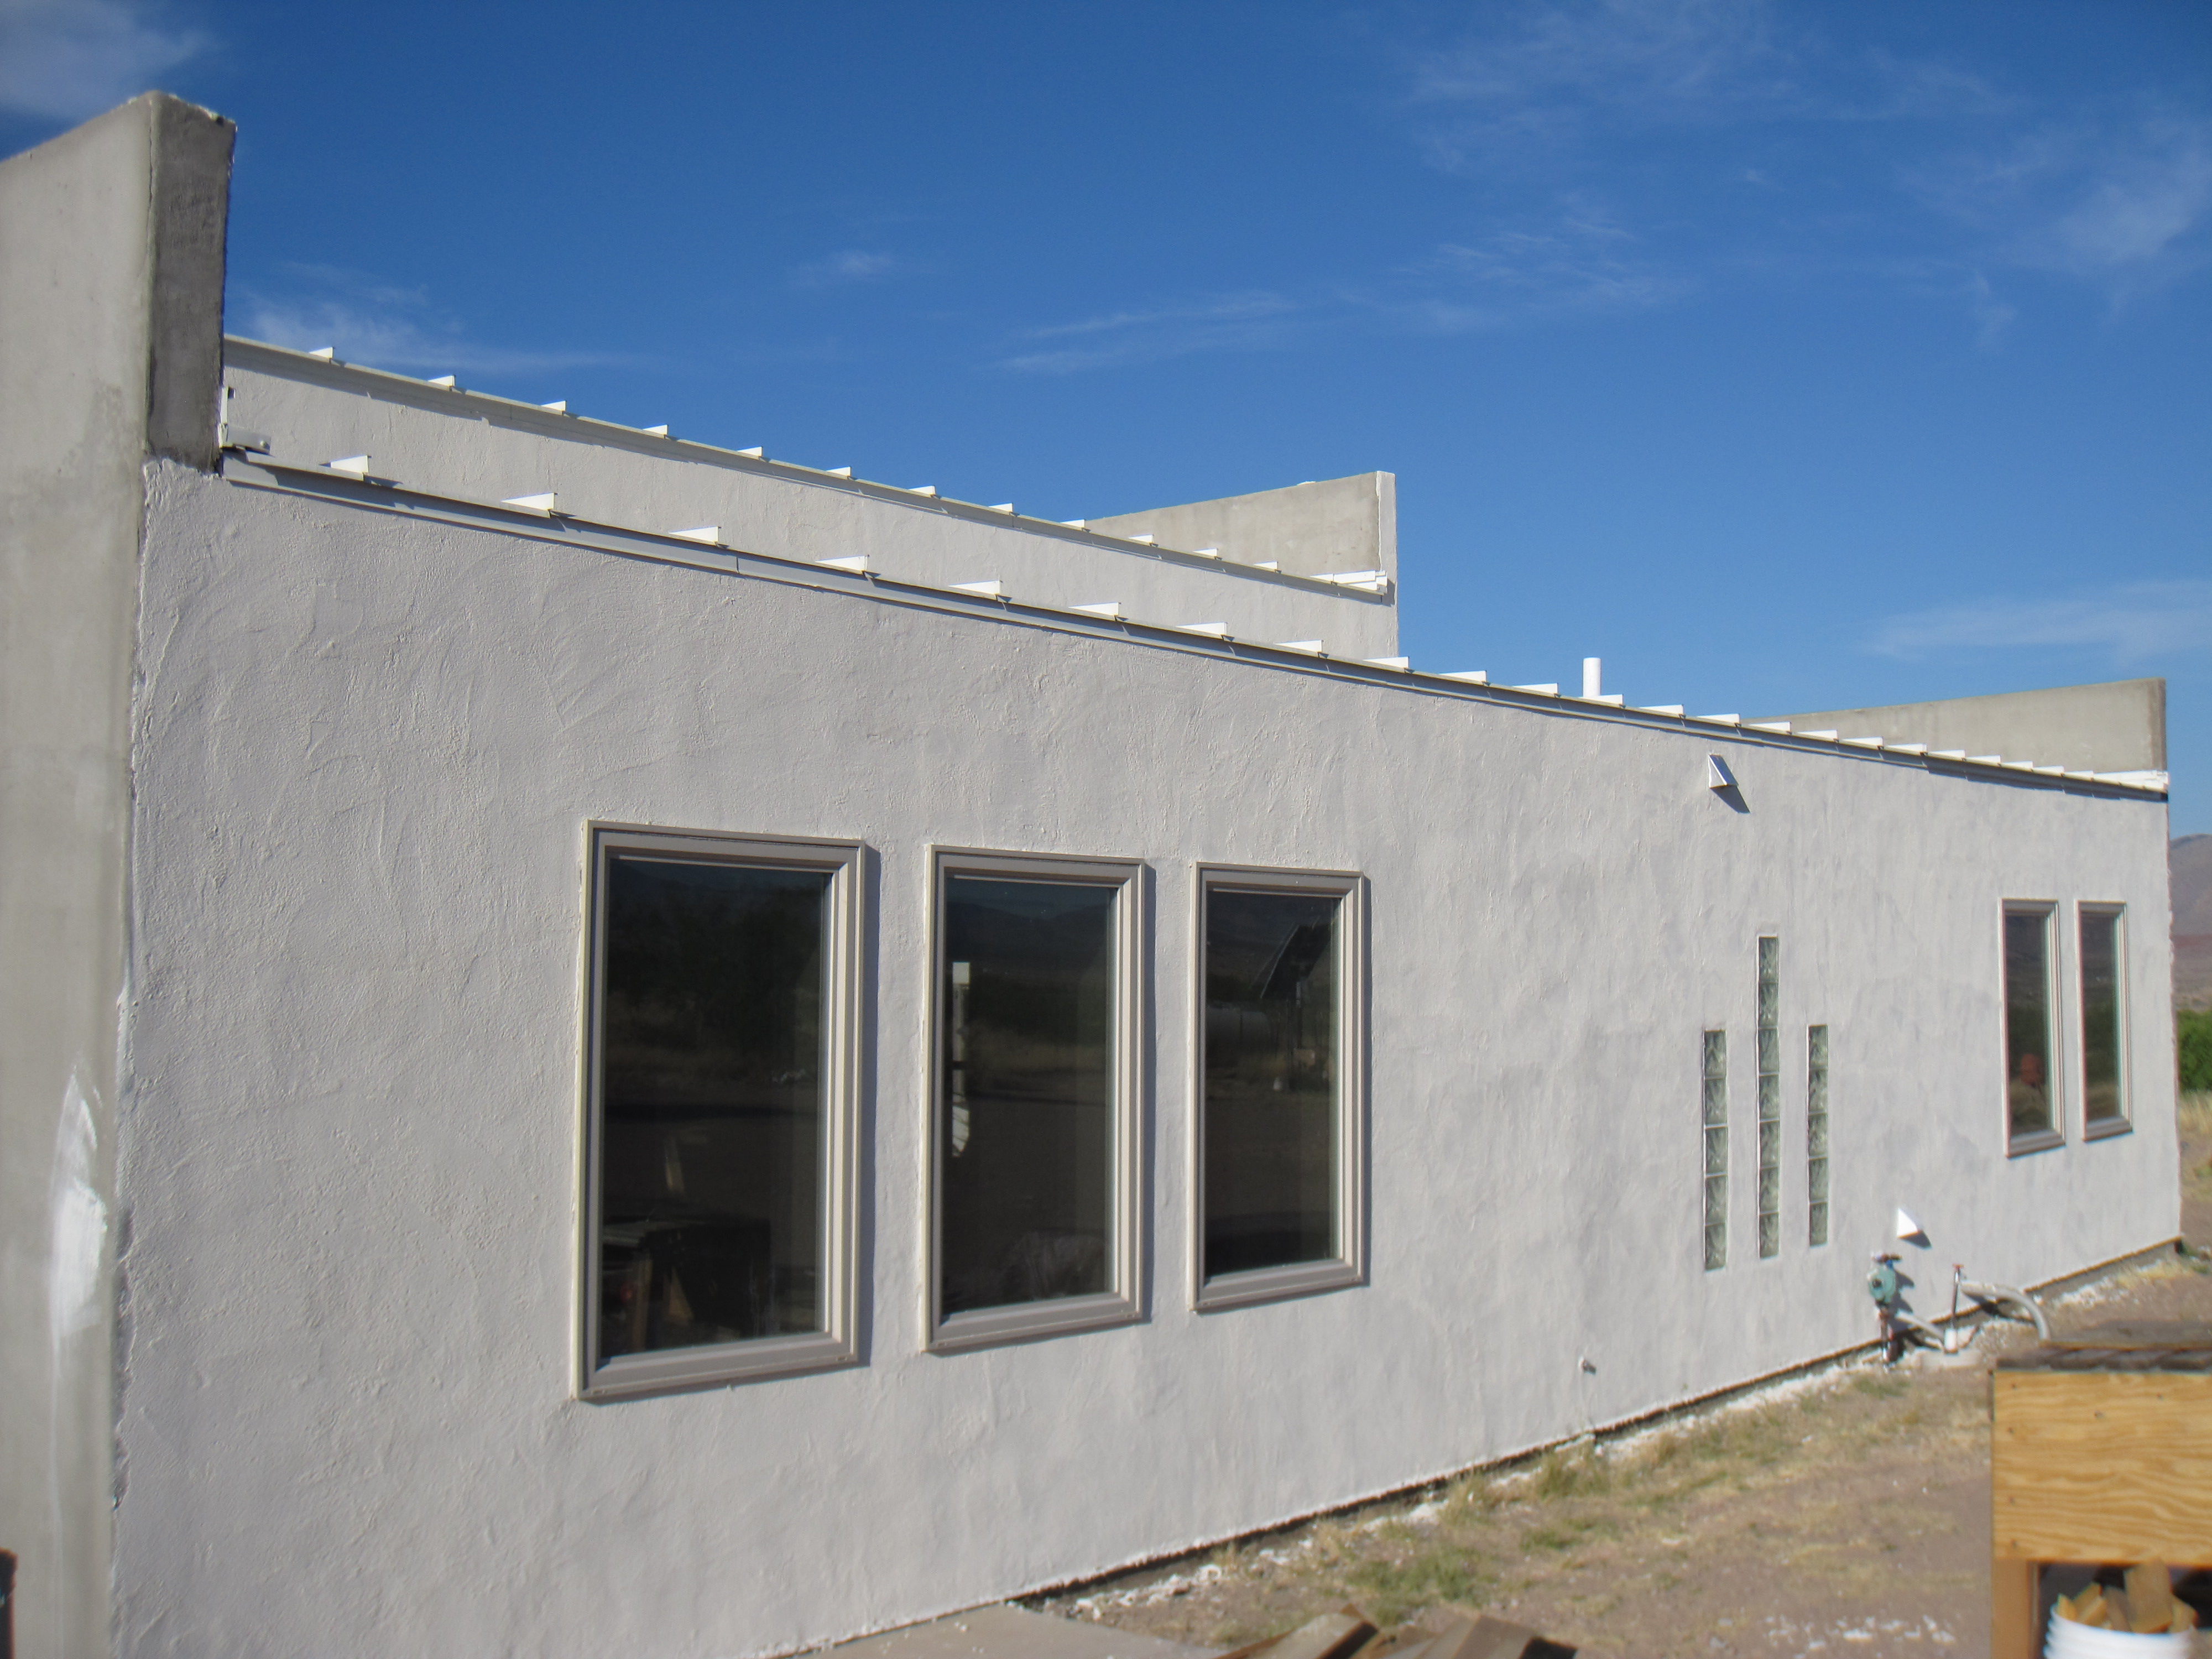
Monday, January 11th, 2010“Architectural details” take a lot longer to stucco than plain flat walls. Lookin’ good though.

Several people have asked what the final color will be. (This is the base coat; there will be a finish coat over this.) It will be a light off-white (soapstone?) like the greenhouse columns.
And here’s today’s Buddhist thought of the day: “Chaos is inherent in all compounded things. Strive on with diligence. – Buddha”
And so we strive on.
The door to (battery) happiness
Tuesday, January 5th, 2010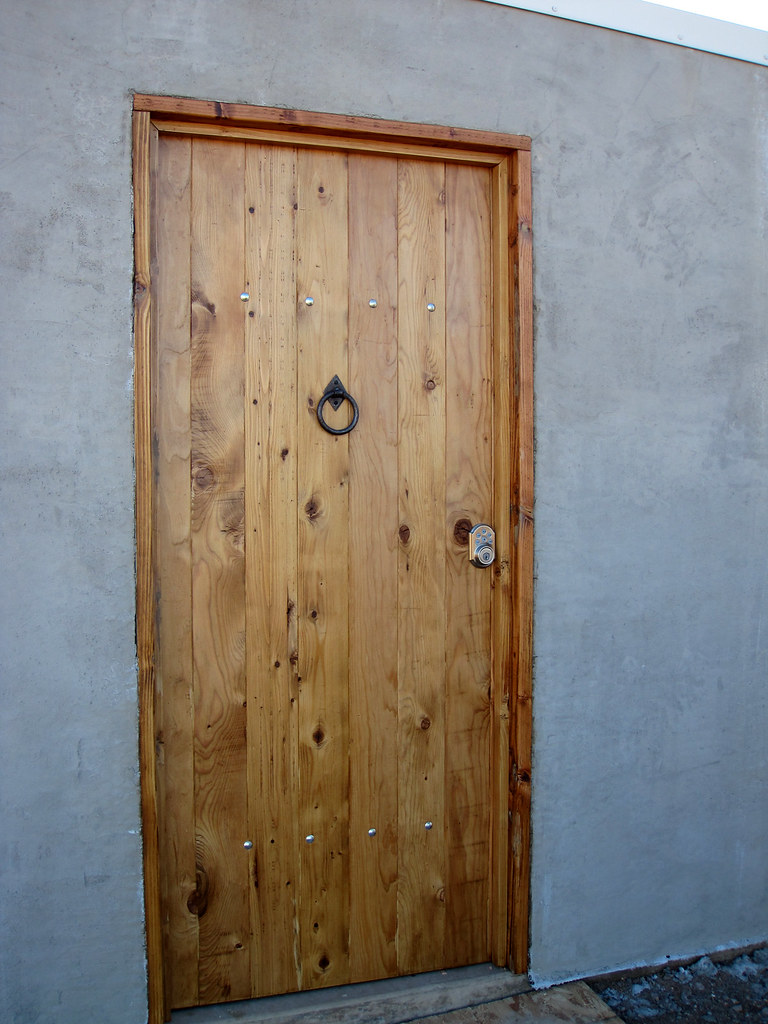
Making doors – Part 2
Thursday, December 31st, 2009Since the snow before Christmas, we’ve had another snowfall (this is not seeming like the desert southwest), and it’s been cold — low 20s at night and not out of the 40s during the day. With a brisk north wind, that’s too cold to stucco, so we’ve been working on solar and other things. One of them is the woodworking.
As you may remember, we began a test run of building our own doors just before Thanksgiving. It was a project that we weren’t in a huge hurry to finish, but now that the batteries are in their house and the weather is cold, the battery house needs a door.
After many rounds of sanding, I proceeded with staining the door. I used Minwax wood conditioner first (which I really liked) and then an oil-based stain. It went on very nicely. Then we began working on mounting the door hardware and hanging the door. (In hindsight, I would have done all the hardware work before even staining. It didn’t make a huge difference, but I did have some touch-up work to do afterward.)
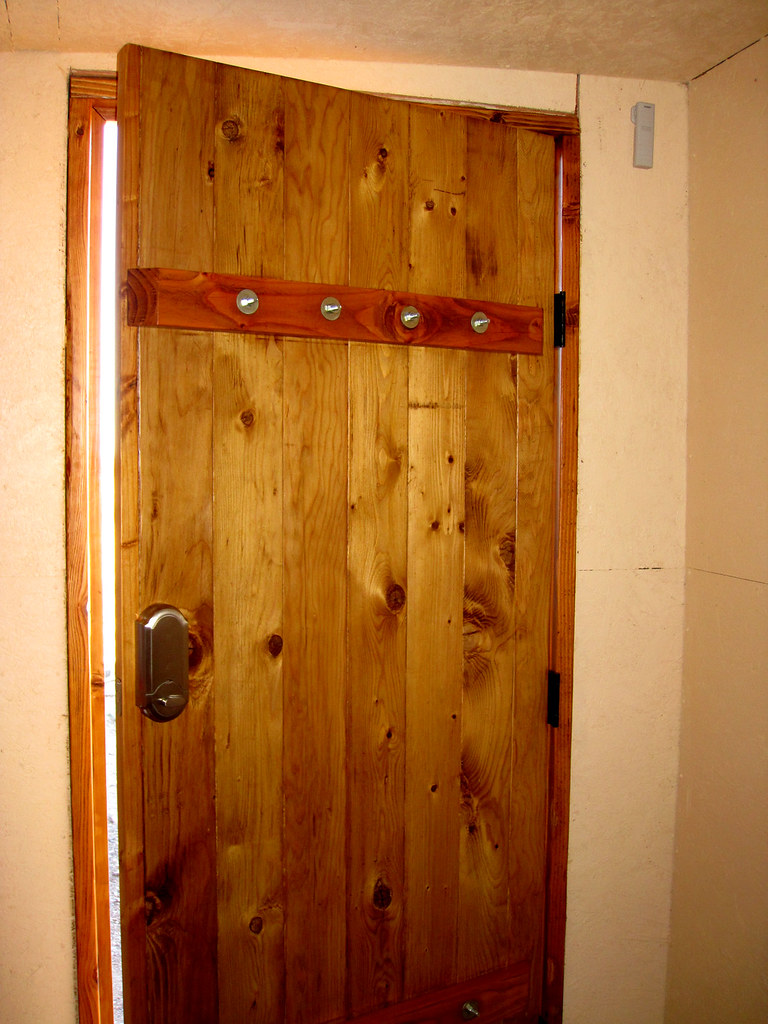
First, Brad used a template to rout out the space for the hinges, both on the frame and on the door itself.

Then we did a test hang (the first of many) to check the door height and width. We needed to trim just a bit off the top and the bottom, which went smoothly.
Then we worked on the width with a planer. This not only narrowed the door to fit, but also put a bevel on the door so it would close right.

The process here is first to plane and then to test hang to check fit. Repeat, repeat, repeat. It took many, many times to get it just right.
Then for the last steps of several coats of varnish and installing the lock. Here is the varnished door.

I also stained and varnished the door frame, which is really looking nice. (It’s been fun to finally do something that I had some pre-existing expertise in — thanks Dad!)
You’ll have to wait to see it hung with final hardware … it’s taken me so long to get this posted that we’ve now commenced stucco’ing. And with stucco started, everything else will be on hold for a while.
Arches and lath
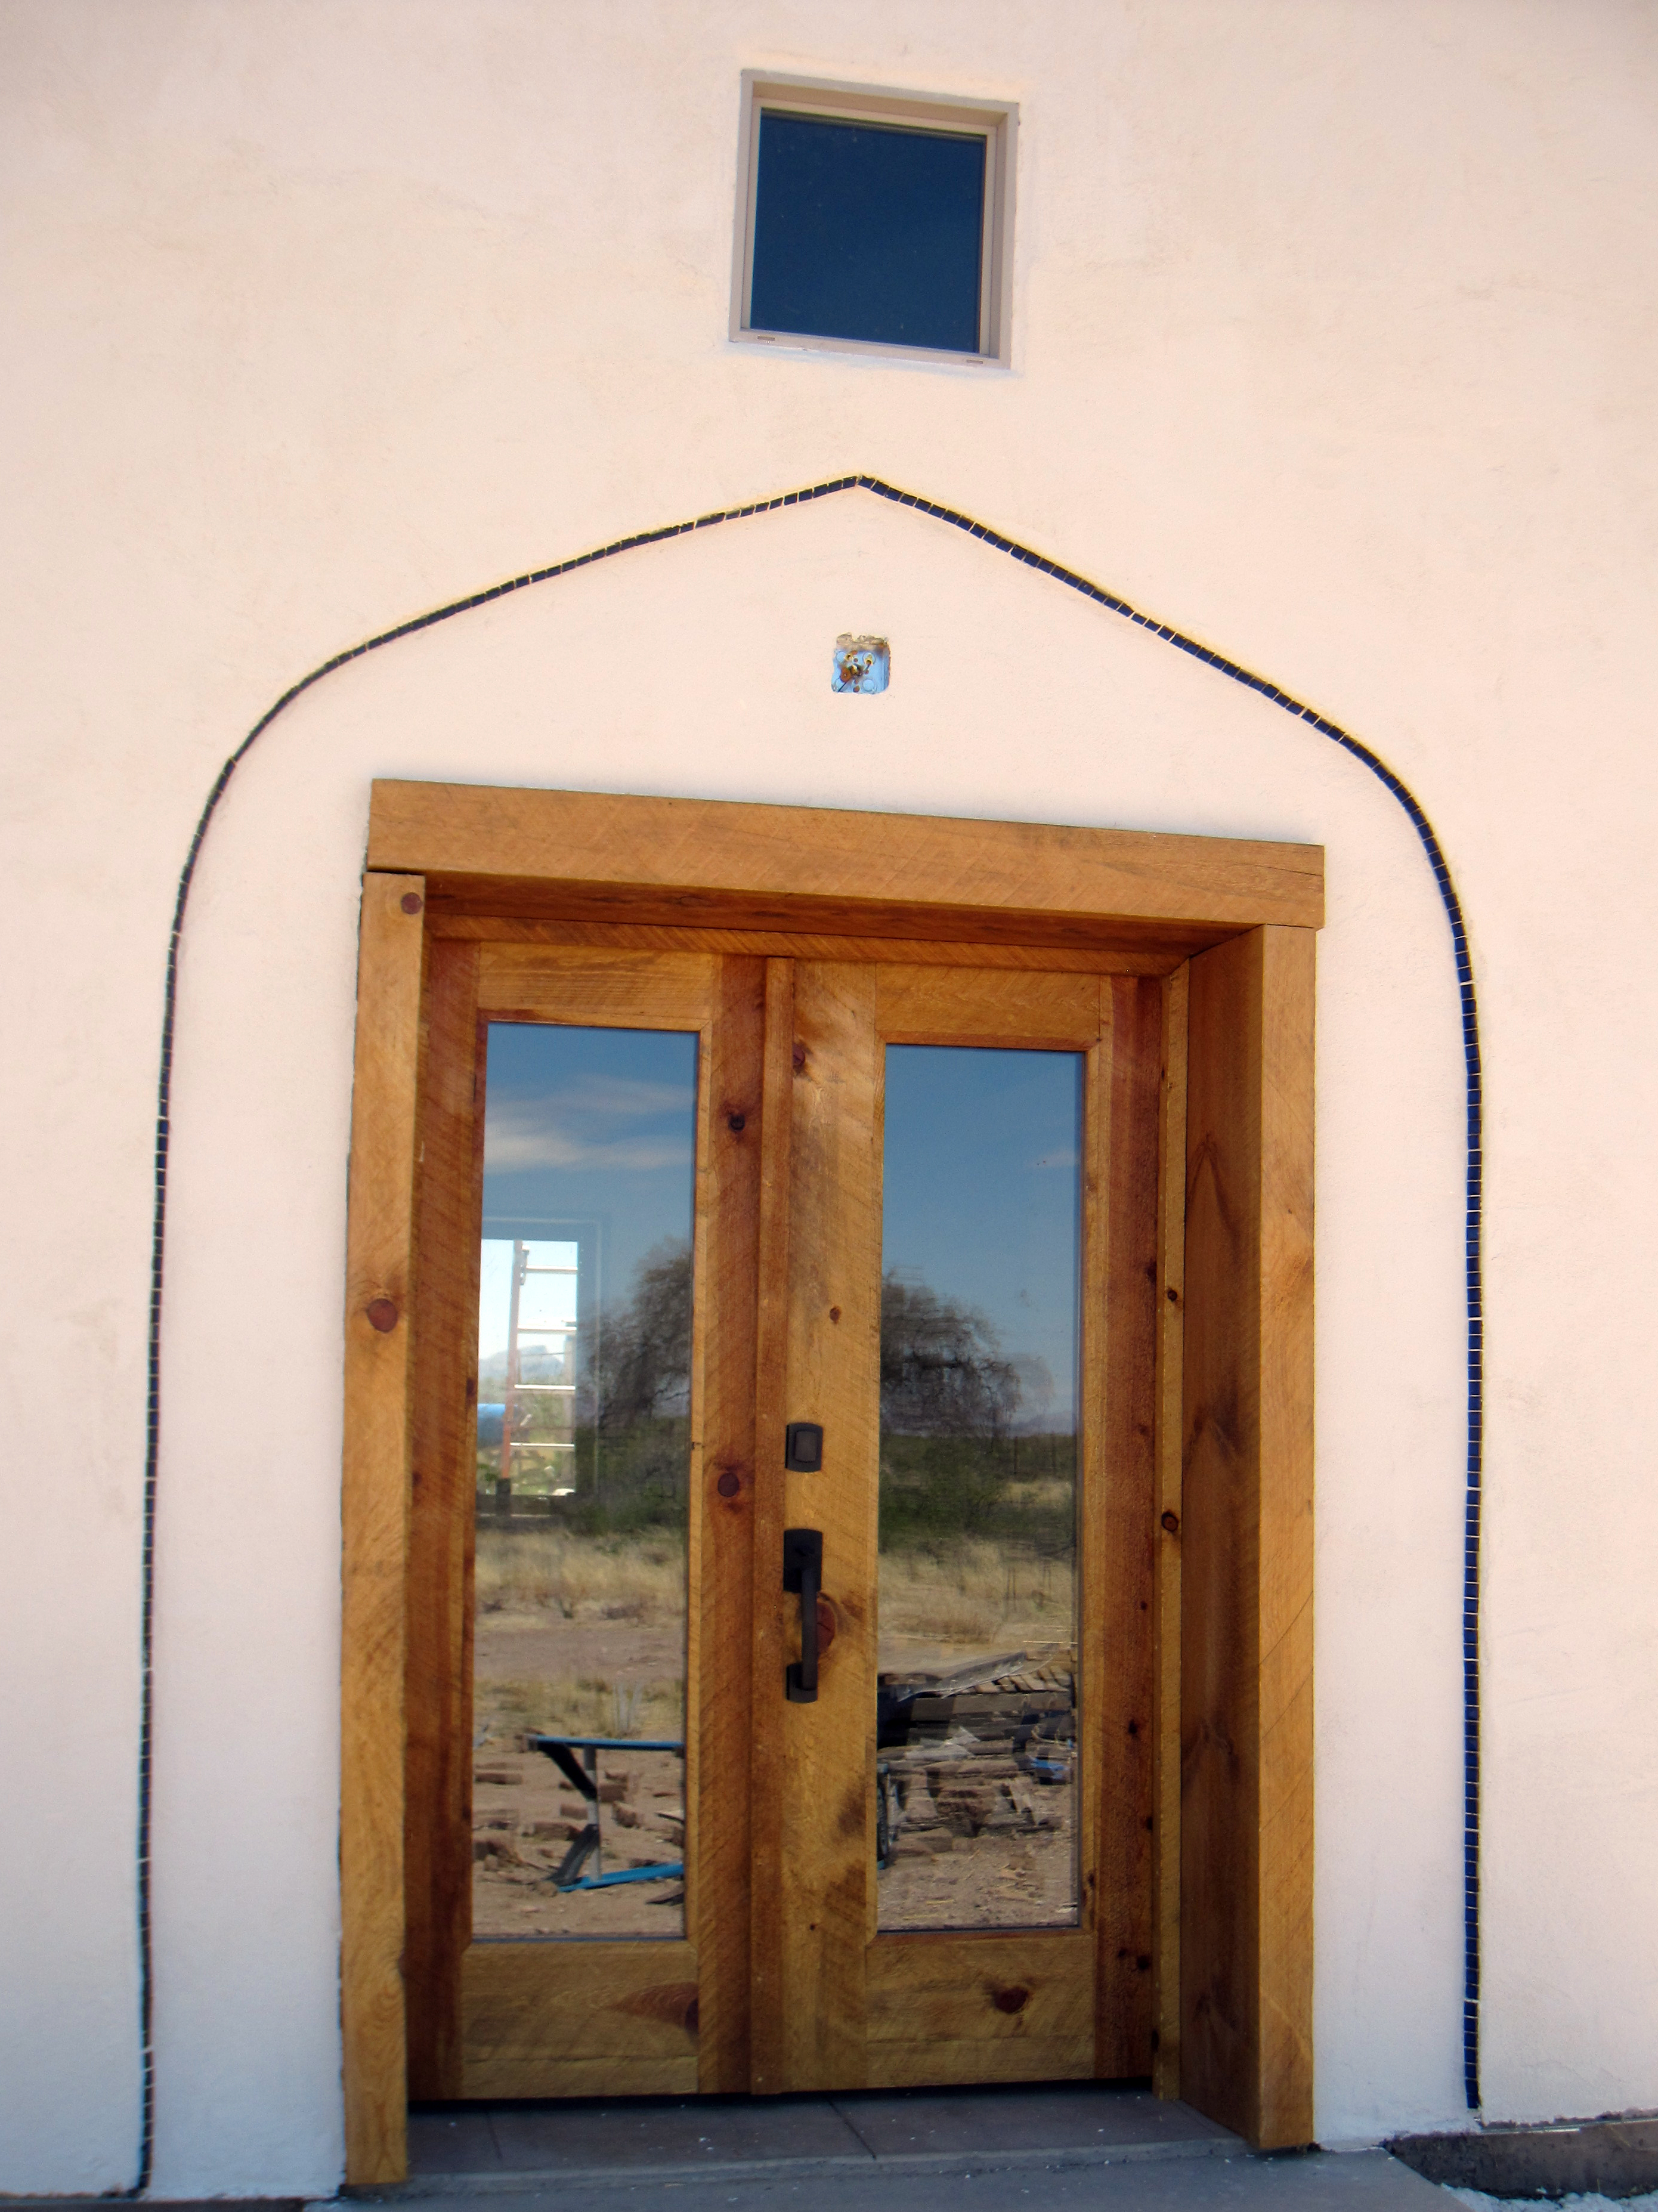
Wednesday, November 18th, 2009One of the things we wanted to experiment with as we built the battery house is archways. We’ll have several archways in the houses, both inside as doorways and outside as an architectural element. The idea is to have indented archways around a few of the outside doors.
This kind of detail is added by putting Styrofoam on the outside of the house and then stucco’ing over it. Apparently, some people put this inch-thick Styrofoam over their whole house (for insulation value, we hear…that seems very odd to us), but we’re doing it just for looks where we want detail like this.
While I love the design (see below), I have been concerned about how we would do the arches.

Brad has always said he’d just “freehand” it, and it would be fine. Today, we found out.
We began by looking at different shaped arches on the Internet. Then we talked about how we’d do it. Since Brad thought he could just draw it and this was only a test (we could always throw out the foam if it didn’t work; we have lots), I said go for it.
We planned to cut one half first and then use that as a guide for the other half so they’d be symmetrical. Brad started by showing me how this would work and that it would indeed result in the point at the top that I wanted.

Then he drew out the design.
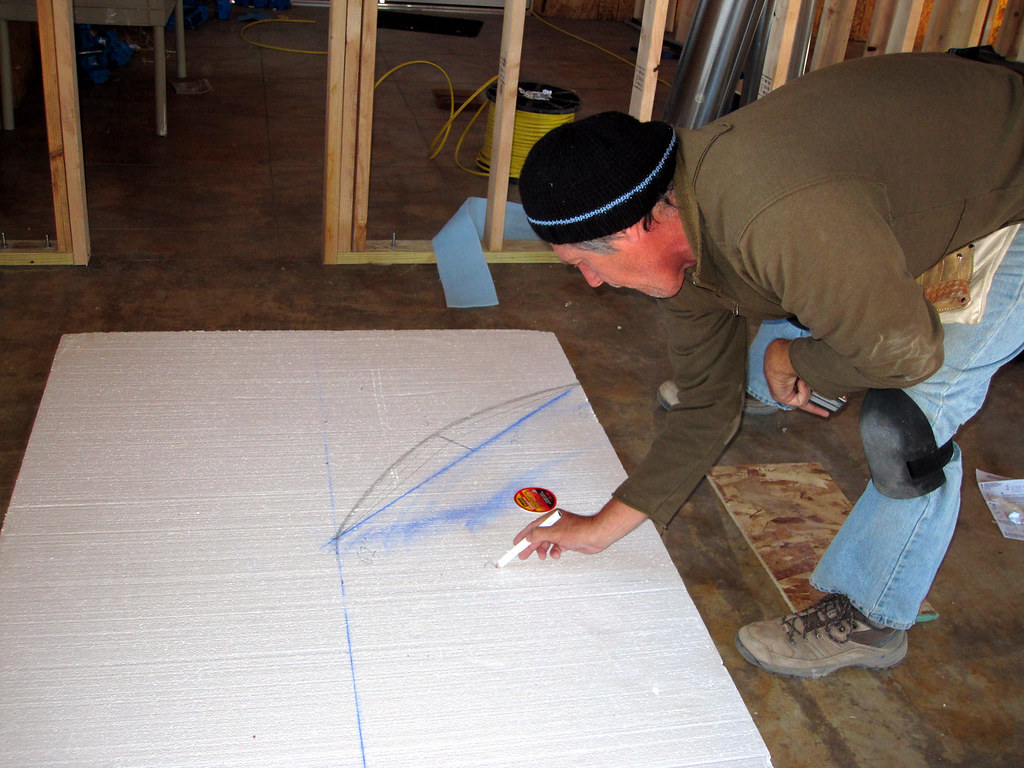
He cut the foam with a jigsaw and used a guide for the straight part.
Here’s the end result.
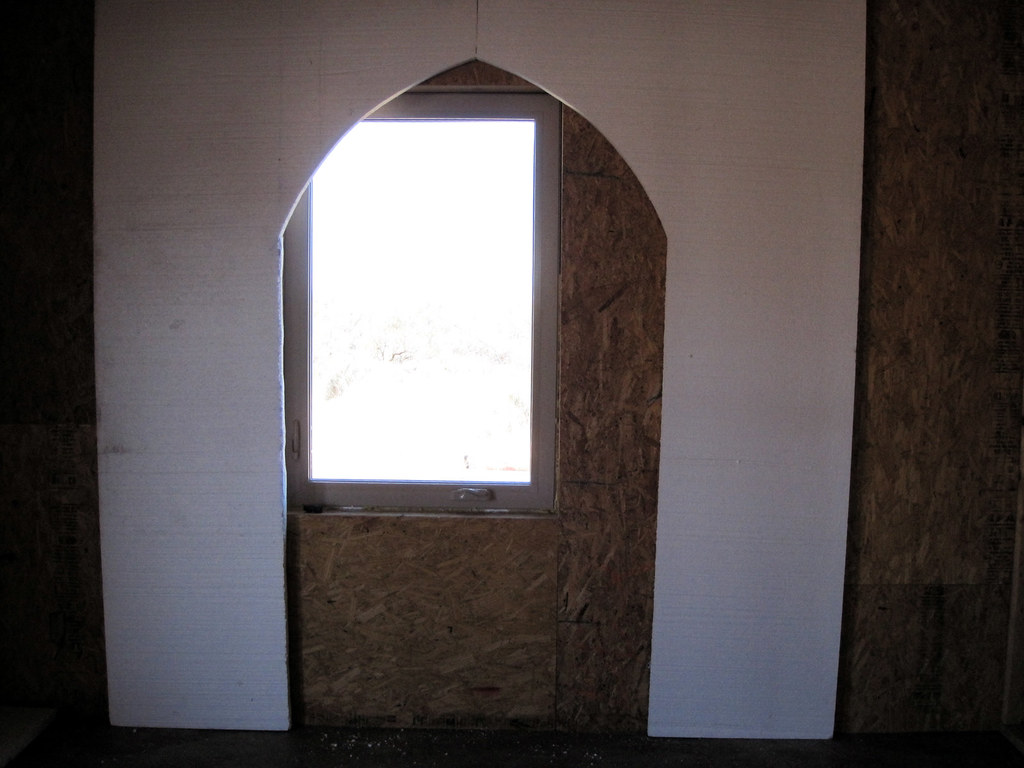
And on the actual battery house.
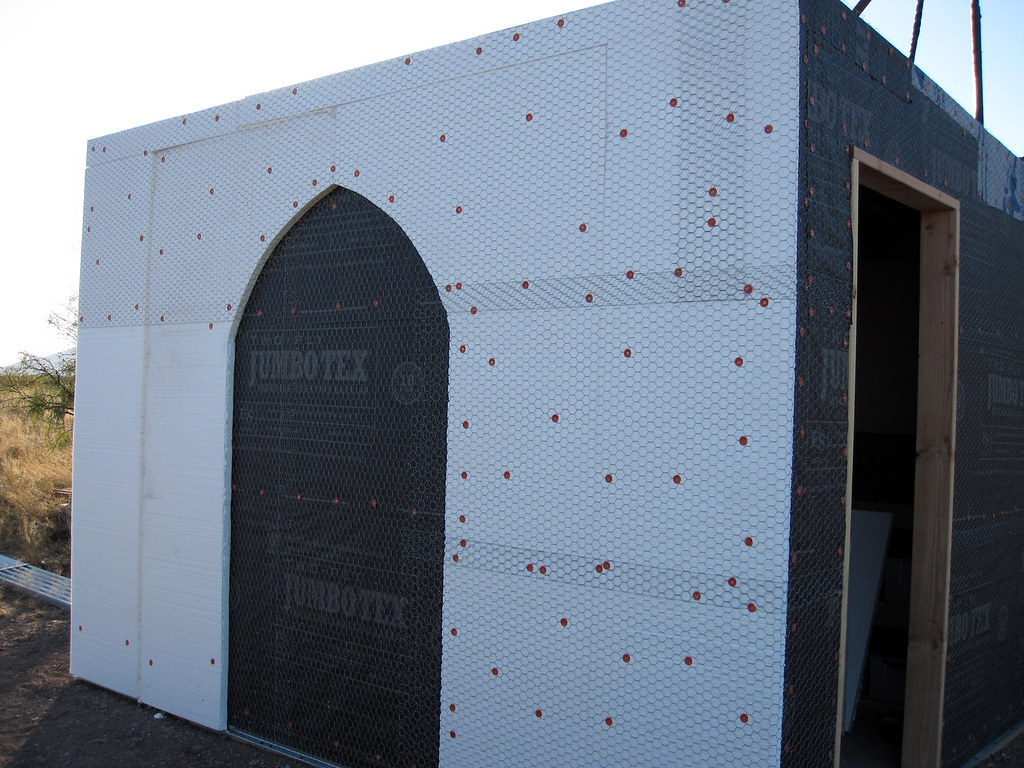
After we got the arch done, we mounted it on the wall of the battery house and started on lath. The lath we’re using is called stucco netting, and it looks pretty much like chicken wire (or what they call here “poultry netting;” that cracks me up). We were both dreading how difficult it would be to put up.
It has to be nailed down very tightly so that the stucco goes down smoothly. And the stucco goes on in a very thin coat, so you can’t really cheat it much. On the solid wall, we used a staple gun to nail it down. On the foam we had to use very long roofing screws, which was a lot harder. Overall, though, it really wasn’t bad to put up. More pictures here if you’re interested.
All in all, a very good day’s work.
Making doors: take 1
Tuesday, November 17th, 2009So, we have begun to make our first door. Here are the steps.
First, we chose seven 2×6 boards that were reasonably straight, flat, and nice looking, a challenge given the quality of our lumber. Here the boards laid out on the slab to make sure they are flat.

Then we used a table saw to cut about 1/2″ or so off each side to square them up and help ensure fit.

Then we ran a router around the edge to give a beveled look. There are many shapes of router bits with various angles, etc. We chose one that would make a shallow, slightly rounded edge.

Next, we laid out the boards on a series of four pipe clamps with cardboard underneath for gluing. We smeared the edges of each board with carpenter’s glue and then clamped then tightly together, trying to make sure the boards were all flat with no bowing.

Here it is all clamped together….now to wait for 24 hours.

After it came out of the clamps, everything looked great. It’s going to be a week or so before we get to town to get stain and varnish to finish it, so you’ll have to wait until then to see the final results.
360 on the doors
Tuesday, October 27th, 2009In one afternoon, I have totally changed my thinking about interior doors.
Originally, I had been thinking about rustic wood plank doors. Then I looked at prices and decided that it wasn’t worth it.
Then I found some pretty nice and inexpensive wood doors at Lowe’s that I liked. They have a kind of arch in the top panel that I thought would look nice with our other arches.
This afternoon we went to visit someone’s house who has solar to see his setup. (We also heard he has a very nice adobe house, and I’m always eager to get new ideas on interiors.) We weren’t exactly sure where he lived and inadvertently ended up at someone else’s house. It was someone else we’d wanted to see though (they’re on the board of the local fire & rescue, for whom we are doing a web site, and they have done their own lovely cabinetry), and so we took a quick tour of their house. It was a very nice house, and they have done all the work themselves. As we were walking through, lo and behold, they had the Lowe’s doors I was thinking about. I really liked how they looked which helped confirm my plans to go with these doors.
Then we went on to the house we had actually intended to visit. Wow. Beautiful house. And all the interior doors were made by the owner out of plank wood. They were stunning. He said that all he did was laid 2×8’s on a table, glued the edges, and clamped them. When they dried, he nailed two planks crosswise at the top and bottom to add stability. Then he rough finished them with a wire wheel and distressed them a bit to add character. (He also hand forged his own cast iron handles, but I would be happy just buying those.) So that all seemed manageable and something we could do (which Brad confirmed on the way home).
We really only have one interior door in the main house, but we have several in Tumbleweed. I would like to try this there. My only real hesitation is that we have so much else to do, but I think we could leave this door project until after we move in.
Also on this drive, we found another old abandoned train car. I took pictures and am still working on my collection. Stay tuned.
By the way, it is windy and cold here. Yesterday, it was 36 when I left in the morning. They are talking about possible snow later in the week.